POS Reports
Find the right POS report, read it for the dates and branch you want, and know when to use the X-Report and the Z-Report.
Where the reports are
- POS app: the Reports screen has three reports for the counter: Sales, X-Report and Z-Report.
- Web admin: Point of Sale > Reports has the full set, with more detail and a print view.
Which reports you see depends on your permissions. Sales reports, staff reports and the daily cash reports are each a separate permission. In the Web admin, the Reports menu appears only if you may view sales reports.
Reports in the POS app
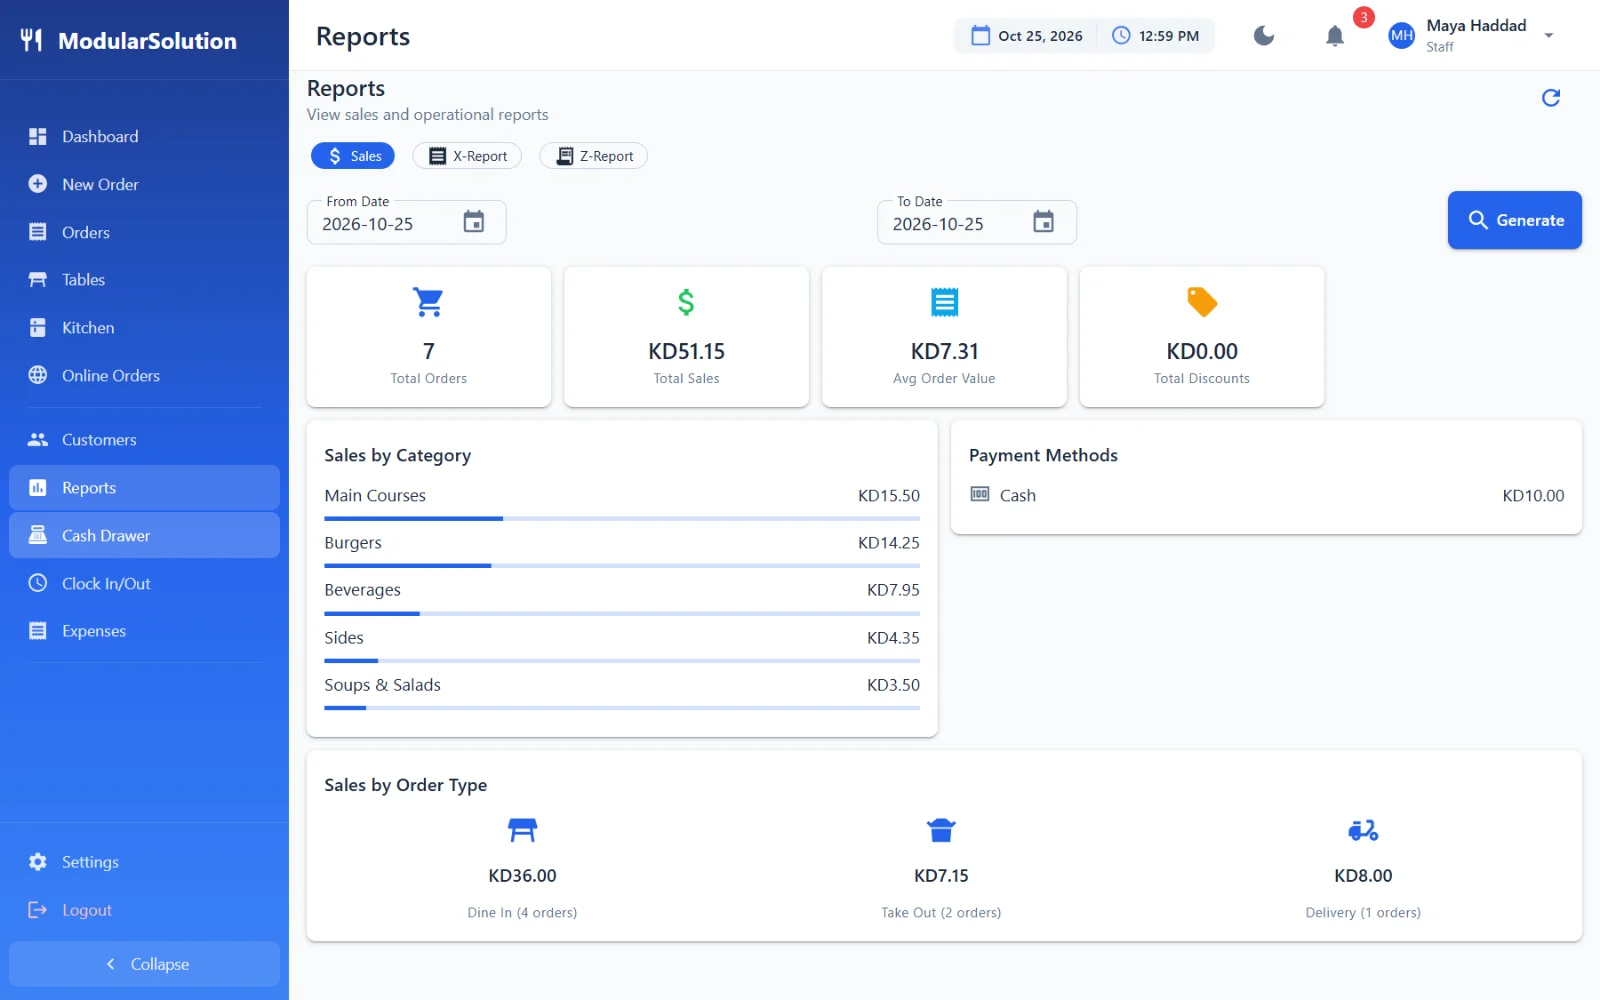
In the POS app, choose Reports in the menu. You need permission to view sales reports.
-
Choose the reportTap Sales, X-Report or Z-Report at the top.
-
Set the datesFrom Date and To Date start on the date of the open business day. The Sales report uses both dates. The Z-Report uses From Date only. The X-Report ignores the dates.
-
Tap GenerateThe report is shown for the branch this device is set up for.
| Report | What it shows |
|---|---|
| Sales | Total Orders, Total Sales, Avg Order Value and Total Discounts for the dates, then Sales by Category (the five best categories), Payment Methods and Sales by Order Type (dine in, take out, delivery). |
| X-Report | Your own current shift: Opening Balance, Current Balance, Cash Sales, Card Sales (all payments that are not cash), Total Orders, Voids/Refunds and Net Sales. |
| Z-Report | The whole branch for one date: Total Sales, Total Tax, Total Discounts, Total Orders, Cash Collected, Card Collected (all payments that are not cash), Opening Balance, Closing Balance, Expected Cash, Variance and Net Revenue. |
The Print button on the X-Report and Z-Report in the POS app does not print yet. To print one, open the report in the Web admin and click Print there.
Reports in the Web admin
In the Web admin, open Point of Sale > Reports. The menu lists the most used reports. All Reports opens the POS Reports Dashboard, which shows today's net sales, orders and tips for your branch and a card for every report.
Choosing the branch and dates
- Most reports have Branch, Start Date and End Date at the top. Set them and click Generate. They open on the last 7 days. The Customer Report opens on the last 30 days.
- Hourly Sales and End of Day are for one day. Use the Today and Yesterday buttons, or pick the branch and the date. The report reloads when you change them.
- The Sales Report, End of Day, X-Report and Z-Report have a Print button.
Reports in the menu
| Menu item | What it shows |
|---|---|
| Sales Report | Gross sales, discounts, net sales, tax collected, tips and total orders for the period, with cash and credit expenses, a daily breakdown and a split by order type. |
| Hourly Sales | Sales and orders for each hour of one day, with the peak hour. |
| Item Sales | The best-selling menu items by revenue, and sales by category. The page is titled Top Selling Items. |
| Staff Performance | For each employee: orders served, sales, average order value, tips, hours worked and sales per hour. |
| Labor Cost | Total labor hours and labor cost, labor cost as a percentage of sales and sales per labor hour, with a daily breakdown. |
| Caller Performance | Orders and revenue referred by each caller, with a daily breakdown and a split by hour. |
| Cash Reconciliation | For each cash drawer in the period: employee, shift, opening amount, cash sales, expected amount, counted amount and variance, with a summary of the cash transactions by type. The top shows how many cash drawers were balanced, over or short. |
| End of Day | One day for one branch: gross and net sales, tax and tips, total orders, order types, payment methods, the cash drawer (opening, closing and variance), voids and comps, and hourly sales. |
| X-Report (Shift) | One shift of one staff member. See below. |
| Z-Report (EOD) | The whole branch for one date. See below. |
Reports on the All Reports page only
These reports are not in the menu. Open Point of Sale > Reports > All Reports and click the card.
| Card | What it shows |
|---|---|
| Product Mix (PMIX) | Each menu item's share of total revenue and of the quantity sold. |
| Discount Analysis | Total discounts and their share of sales, discounts by type, total voids and comps, and voids by employee. |
| Refund Report | The number and amount of voids and refunds, grouped by reason. The page is titled Refund & Void Report. |
| Tax Report | Tax collected, gross sales, net sales and the effective tax rate for the period. |
| Customer Report | Total and new customers, total revenue, average spend per customer and your top customers. |
| Delivery Report | Total deliveries, success rate, average delivery time and revenue, with the numbers for each driver. |
The page also has cards for the reports in the menu. Some have a slightly different name on the card: Sales Summary opens the Sales Report and Top Items opens Item Sales.
The Table Turnover card opens a report page that has no figures at present.
X-Report and Z-Report
Both reports summarise sales, payments and cash. They differ in what they cover.
| X-Report | Z-Report | |
|---|---|---|
| Covers | One shift of one staff member. | The whole branch for one date. |
| Orders counted | Orders assigned to that staff member and created during the shift. Cancelled orders are left out. | All orders of the branch created on that date. Cancelled orders are left out. |
| Cash | The cash drawer of that shift. | All cash drawers of that business day, with expected cash, counted cash and the variance for each. |
| Also shows | Order types, payment methods, and the number of voids, discounts, comps and refunds. | The same, plus a summary of each shift, tips, and sales for each hour. |
| When to use it | During a shift or after it, to check one person's sales and cash drawer. | At the end of the day, to check the whole day for the branch. |
Opening an X-Report or a Z-Report only shows figures. It does not close a shift, a cash drawer or the business day, and it does not reset any totals. You can open both as often as you like. To close the day, see Closing the Day.
Open an X-Report in the Web admin
-
Go to Point of Sale > Reports > X-Report (Shift)The page X-Report - Select Shift lists the shifts of today for your branch.
-
Choose the dayUse Today or Yesterday, or pick the branch and the date. Each shift shows the employee, status, start and end time, hours, orders and sales.
-
Click View Report on the shiftThe X-Report (Shift Report) opens. Click Print for a print view.
Open a Z-Report in the Web admin
-
Go to Point of Sale > Reports > Z-Report (EOD)The Z-Report (End of Day) opens for today and your branch.
-
Pick another date if neededUse the date box at the top right. The report reloads.
-
Click PrintA print view opens in a new tab.
X-Report and Z-Report in the POS app
On the Reports screen of the POS app, X-Report always shows the current shift of the person who is signed in, and Z-Report shows the branch for the date in From Date. They show fewer figures than the Web admin versions.
Troubleshooting
"X-Report requires an active shift. Please clock in first, or use Z-Report to view the daily summary."
The POS app shows the X-Report for your current shift, and you are not clocked in. Clock in under Clock In/Out, or tap Z-Report for the figures of the whole day. To see the X-Report of a shift that has ended, use the Web admin.
"Please configure a branch in POS Setup first"
The POS app on this device has not been set up for a branch. See Install the POS App.
"Please select a branch to generate the report"
The Web admin could not tell which branch to report on. Choose a branch in Branch at the top of the report and click Generate.
"No Shifts Found"
No shift was recorded for the branch on the date you chose on the X-Report - Select Shift page. Pick another date.