Install the POS App
Install the POS app on a Windows computer, sign in, link the terminal to a branch and keep it up to date.
The POS app is the program your staff use at the counter to take orders, take payment and run the cash drawer. The back office (menu, stock, users, reports) is the Web admin, which runs in a browser and needs no installation.
Before You Start
Have these ready. Without them the app cannot finish its first-time setup.
| You need | Why |
|---|---|
| A Suvaiq account | You sign in to the POS app with the same email and password you use for the Web admin. |
| An active branch | Each terminal is linked to one branch. Branches are managed in the Web admin under Branches. |
| A manager PIN | A manager must approve the terminal with their PIN. The PIN is set in the Web admin under My PIN. See Users, Roles and Branches. |
| A Windows computer | Windows 10 version 1809 or later, 64-bit. The Download page lists the full system requirements. |
A new account has no PIN. Before you install the app, sign in to the Web admin, click your name at the top right, choose My PIN and set one. If nobody at the branch has a PIN, the terminal setup stops at the approval step.
Download and Install
-
Open the Download pageOn the computer that will be the POS terminal, open the Download page.
-
Download the installerClick Download for Windows and save the file.
-
Run the installerOpen the downloaded file. Windows may show a SmartScreen warning the first time. If it does, click More info, then Run anyway.
-
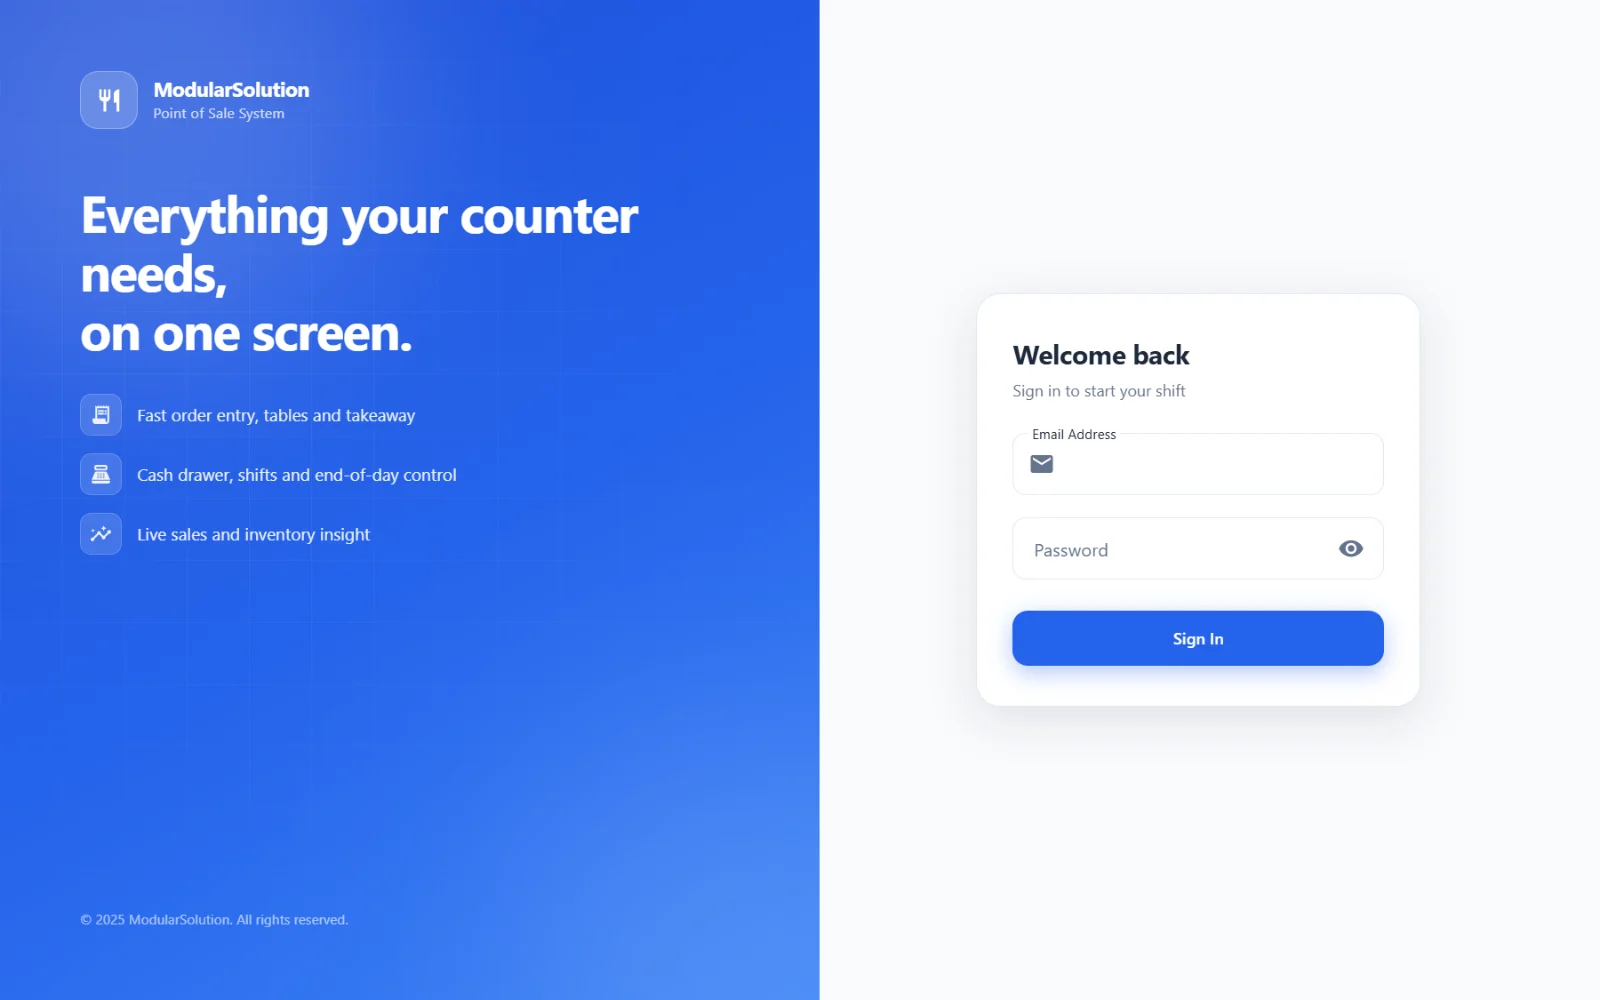
Start the appWhen the installer finishes, open the POS app. It shows the sign-in screen.
You install the app once on each terminal. After that it updates itself, as described under Updates below.
Sign In for the First Time
-
Enter your email and passwordType your Email Address and Password. These are the same as for the Web admin.
-
Tap "Sign In"Because this terminal is not linked to a branch yet, the app opens the Configure POS Terminal screen.
Choose the Branch for This Terminal
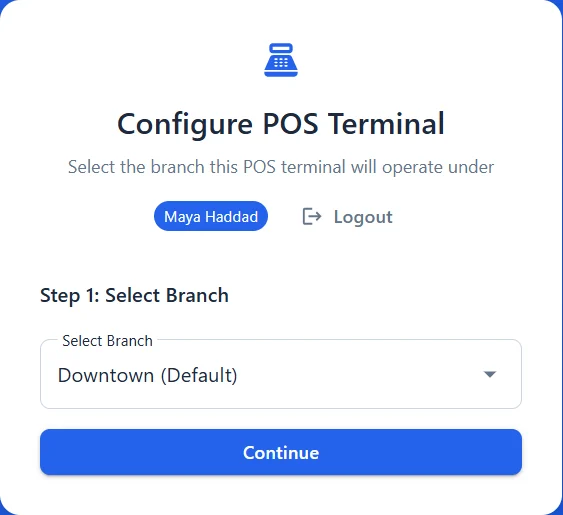
A terminal works for one branch. Orders, the cash drawer and the business day on this terminal all belong to the branch you choose here.
-
Select the branchUnder Step 1: Select Branch, open the Select Branch list and choose the branch. Your default branch is marked (Default). If you have only one branch, it is already selected.
-
Tap "Continue"The screen moves to Step 2: Manager Authorization.
-
Tap "Authorize"The Manager Authorization window opens with a list of managers under Select Manager.
-
Select the managerTap the name of the manager who is approving the terminal.
-
Enter the manager PINThe manager types their PIN in Enter PIN and taps Authorize.
-
Tap "Continue to Dashboard"The app shows Setup Complete! and the name of the branch. Tap Continue to Dashboard to start using the terminal.
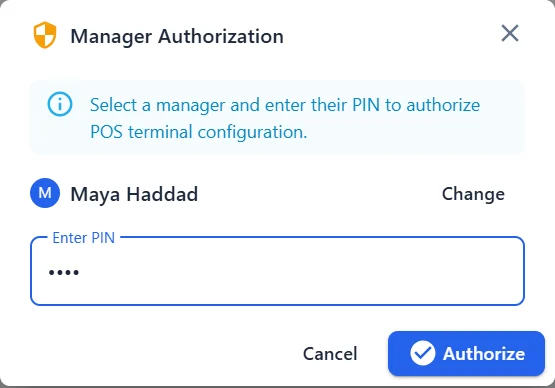
The list shows people who are allowed to manage branches, are assigned to the branch you selected, are active, and have a PIN that is not locked. The person must also be allowed to approve exceptions, otherwise their PIN is rejected.
With the built-in roles, that is a user with the Administrator role. Three wrong PIN entries lock that PIN for 15 minutes.
Signing In After Setup
Once the terminal is linked to a branch, the sign-in screen changes:
- It asks for a Username instead of an email address. The username is the one set for the person in the Web admin under Users. For the account created when you signed up, the username is your email address.
- You can switch between Password and PIN. With PIN, type your username and enter your 4 to 6 digit PIN on the keypad.
- The branch name is shown under the sign-in form, with a Change button.
The terminal is for people assigned to that branch. Someone who is not assigned to it is signed out again with the message "You don't have access to this POS terminal" and the branch name.
Move a Terminal to Another Branch
-
Open SettingsIn the POS app, tap Settings in the menu.
-
Tap "Change Branch"The entry shows the current branch and is marked Manager PIN Required.
-
Get manager approvalSelect the manager, enter their PIN and tap Authorize. The app removes the branch from the terminal and signs you out.
-
Sign in and choose the new branchSign in with your email and password, then follow Choose the Branch for This Terminal above.
The Change button on the sign-in screen also removes the branch from the terminal. The next person to sign in must use their email and password and go through the branch setup again, including the manager PIN.
Updates
The Windows app checks for a new version every time it starts. You do not download the installer again.
| What happens | What you see |
|---|---|
| A new version is found | The app downloads it in the background while you work. Nothing interrupts the screen. |
| The download is finished | Update ready appears next to Settings in the side menu (a dot when the menu is collapsed), and on the Software Update entry inside Settings. |
| You install it yourself | Go to Settings > Software Update and tap Restart & install now. The app closes briefly and reopens on the new version. |
| You do nothing | The update installs by itself the next time the app is started, before anyone signs in. |
Restart & install now closes the app. Finish the order on screen first, and install when the counter is quiet.
Check for an update yourself
-
Open Software UpdateIn the POS app, go to Settings > Software Update. Current version shows the version installed on this terminal.
-
Tap "Check now"If there is nothing new, the app shows "You're on the latest version." If there is a new version, it starts downloading and shows the progress. You can keep working while it downloads.
-
Tap "Restart & install now"When the download is finished the app shows that the update is ready to install. Tap the button when it suits you.
Android, iPad and iPhone
Versions for Android and for iPad and iPhone are in pilot and cannot be downloaded yet. To ask for early access, click Request early access on the Download page.
Troubleshooting
"No branches available. Please contact your administrator."
Your account has no active branch. In the Web admin, open Branches and add a branch, or edit an existing one and tick Active. Then tap Return to Login and sign in again.
"Selected branch does not have currency configured."
The branch takes its currency from your account, and your account has no currency set. Contact Suvaiq support at support@suvaiq.com.
"No managers with PINs are configured for this branch. Please contact an administrator."
Nobody who can approve the terminal has a PIN for the selected branch. In the Web admin:
- Sign in as a user with the Administrator role, click your name at the top right, choose My PIN and set a PIN.
- Check that this user is assigned to the branch: open Users, edit the user and select the branch under Branch. This matters most for a branch you added recently.
Then tap Authorize again in the POS app.
"Invalid PIN" or "Account locked due to too many failed attempts"
The PIN was typed wrong. After three wrong entries the PIN is locked for 15 minutes. Wait, choose another manager, or have the manager reset the PIN in the Web admin under My PIN > Forgot PIN.
"You don't have access to this POS terminal"
The person signing in is not assigned to the branch this terminal is linked to. In the Web admin, open Users, edit the user and add the branch under Branch.
"Couldn't check for updates. Try again later."
The terminal could not reach the update service. Check the internet connection and tap Check now again. The app keeps working on the current version.
"Automatic updates aren't available on this build."
This copy of the app was not installed with the installer from the Download page. Install it from the Download page to get automatic updates.