Tables and Reservations
Set up your sections and tables, use the table screen for dine-in orders, and record reservations.
| Task | Where |
|---|---|
| Create and change sections and tables | Web admin: Point of Sale > Table Sections and Point of Sale > Tables |
| Choose a table for a Dine In order and see which tables are busy | POS app: Tables |
| Record and follow reservations | Web admin: Point of Sale > Reservations |
In the POS app, Settings > Tables only explains that tables are managed in Web admin. Nothing can be changed there.
Set Up Sections
A section is a group of tables, such as a dining room or a terrace. Every table belongs to one section, so create the sections first.
-
In Web admin, open Point of Sale > Table SectionsThe list shows each section's name, color, number of tables, display order and status.
-
Tap Add New SectionThe Create Table Section page opens.
-
Fill in the section
- Name: the heading shown above the section's tables in the POS app.
- Display Order: sections are listed from the lowest number to the highest.
- Description: optional.
- Color: pick a color or tap one under Predefined Colors. It is shown in the section list in Web admin.
- Active: only active sections are shown in the POS app.
-
Tap CreateRepeat for each section.
To change a section, tap the pencil icon on its row. To delete one, tap the bin icon and then Delete Section. A section that still has tables cannot be deleted: move or delete its tables first.
Set Up Tables
-
In Web admin, open Point of Sale > TablesThe list shows each table's name, section, capacity, status and whether it is reservable.
-
Tap Add New TableThe Create Table page opens. If you have no sections yet, a Create Default Section window opens first: type a Section Name and tap Create Section.
-
Fill in the tableSee the field list below.
-
Tap Create, or Save and Add NewSave and Add New saves the table and opens an empty form for the next one.
| Field | What it is for |
|---|---|
| Name | The name shown on the table's card in the POS app and on orders, for example Table 4. |
| Section | The section the table belongs to. |
| Description | Optional. |
| Capacity | The number of seats. The POS app shows it on the card and uses it for the guest count buttons. When you seat a reservation, only tables with enough seats for the party are offered. |
| Display Order | The position of the table within its section in the POS app, lowest number first. The next free number is filled in for you. |
| Reservable | Tick it if the table can be booked. Only reservable tables can be assigned when you create a reservation. |
| Floor Plan Position | X Position, Y Position, Width, Height and Shape. The POS app does not draw a floor plan from these: it lists the tables as cards in display order. |
Change, Merge or Delete a Table
Use the icons at the end of the table's row in Point of Sale > Tables. Above the list you can search and filter by section, status and reservable, then tap Apply.
| Icon | What it does |
|---|---|
| Edit | Opens Edit Table with the same fields. Tap Save Changes. |
| Change Status | Opens Update Table Status. Choose Available, Occupied, Reserved or Maintenance, optionally an Assigned Staff member, and tap Update Status. |
| Merge Tables | Shown on tables with the status Available. Tick the tables to join with this one and tap Merge Tables. Only Available tables in the same section are listed. |
| Unmerge Tables | Shown on merged tables. Tap it, then Unmerge Tables to separate them again. |
| Delete | Tap it, then Delete Table. This cannot be undone. |
The Tables screen in the POS app does not show the status set here, and it does not show merged tables as one. It marks a table as busy only while the table has an open order. A table set to Reserved or Maintenance in Web admin can still be chosen for an order in the POS app.
Use Tables in the POS App
The table screen opens when you tap New Order and then Dine In. You can also open it with Tables in the side menu if you have permission to view tables.
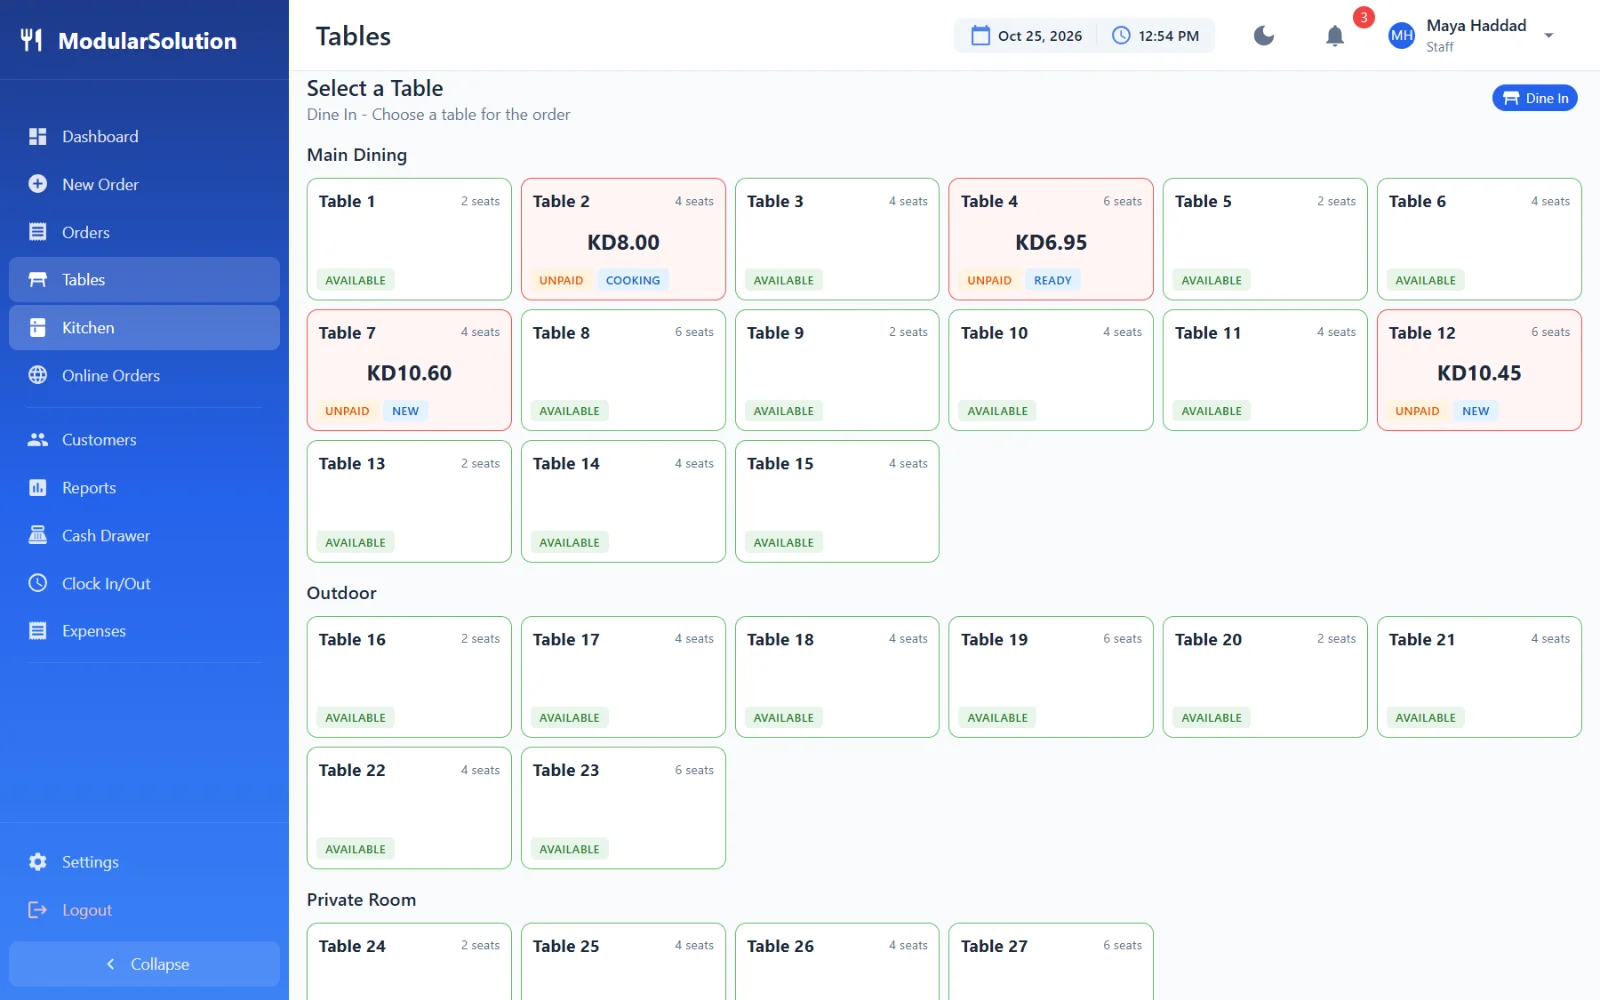
Each card shows the table name and its seats.
- A free table shows Available.
- A busy table shows the total of its open order, a Paid or Unpaid badge, and the order status: Pending, New, Cooking, Ready or Served.
- Checking… is shown for a moment while the app loads the open orders.
Start an Order at a Free Table
-
Tap the tableThe Number of Guests window opens.
-
Tap the number of guests, then ContinueThe buttons go up to the table's capacity, with a maximum of 8. If the window does not open, the app goes straight to the menu and records one guest.
-
Add the items and tap Save OrderThe table name and guest count are shown at the top of Current Order. See Taking Orders. Once the order is saved the table shows as busy.
Open the Order at a Busy Table
Tap the busy table. The order opens with its items, details and total, and these buttons:
| Button | What it does |
|---|---|
| Mark Served | Sets the order to Served. Shown when the order is Ready. |
| Complete | Closes the order and frees the table. Shown when the order is Served and paid. |
| Payment | Opens the Payment screen. Shown while the order is not fully paid. |
| Receipt | Prints the bill. |
| KOT | Prints the kitchen ticket again. |
| Add Items | Opens the menu to add to this order. |
| Void | Cancels the order straight away, without asking for a reason. If you do not have permission to void orders, a manager PIN is asked for first. |
| Three dots | Sets the order status by hand: New, In Progress, Ready, Served, or Completed for a paid order. |
A table stays busy until its order is Completed or voided. Taking the payment is not enough: after the guests have paid, open the table and tap Complete. A table can have one open order at a time.
The POS app cannot move an order to another table and cannot merge tables.
Reservations
Reservations are kept in Web admin under Point of Sale > Reservations, for the branch you are working in. They are not shown in the POS app.
Add a Reservation
-
Tap New ReservationThe New Reservation page opens.
-
Enter the booking
- Date and Time: required, and must be in the future.
- Guest Name and Party Size: required.
- Phone Number and Email: optional.
- Expected Duration (minutes): from 1 hour to 3 hours. 1.5 hours is selected to start with.
- Source: Walk-In, Phone, Online or Third-Party App.
- Assign Table (Optional): choose a reservable table, or leave Assign later.
- Special Requests: anything staff should know.
-
Tap Create ReservationThe reservation is saved with the status Pending and gets a reservation number.
Follow the Day's Reservations
The Reservations page shows one day at a time.
- Change the Date field to see another day. Today returns to today; the arrows beside it open yesterday and tomorrow.
- Use Status to show only Pending, Confirmed, Seated, Completed, Cancelled or No Show reservations.
- Upcoming (Next 4 Hours) appears at the top when reservations are due soon, with the time left until each one.
- The main list shows the reservation number, time, guest, party size, table, source and status. A speech bubble icon means the reservation has special requests.
Confirm, Seat or Cancel
Use the icons on the reservation's row, or tap the eye icon and use the Actions box on the reservation's page.
| Action | When you can use it | What happens |
|---|---|---|
| Confirm (Confirm Reservation) | Pending reservations | The status changes to Confirmed. |
| Seat Guest | Pending or Confirmed reservations | The Seat Guest page lists the tables with enough seats for the party. Choose one and tap Seat Guest. The status changes to Seated and the table is saved on the reservation. |
| Cancel (Cancel Reservation) | Pending or Confirmed reservations from the list. From the reservation's page, any reservation that is not Completed or Cancelled. | The Cancel Reservation page opens. Type a Cancellation Reason (Optional) and tap Cancel Reservation. Go Back leaves the reservation as it is. |
Seating a guest only updates the reservation. To take the order, go to the POS app, tap New Order, Dine In and the table. The Seat Guest page does not check whether a table already has an open order, so look at the Tables screen in the POS app first.
The status filter includes Completed and No Show, but these pages have no button to set a reservation to either.
Troubleshooting
"No tables found. Make sure the API is running and tables are configured."
The POS app found no tables. Create sections and tables in Web admin as described above, then tap Retry. If tables exist, check the device's connection.
A Table Is Missing in the POS App
The app only shows tables that belong to an active section. In Web admin, check the table's Section under Point of Sale > Tables, and check that the section is ticked Active under Point of Sale > Table Sections.
A Table Still Shows as Busy After the Guests Left
Its order is still open. Tap the table, take the Payment if it is unpaid, then tap Complete. If the order should not exist, void it.
"Table already has an active order"
Someone saved an order for this table while you were taking yours. Go back to Tables, tap the table and use Add Items on the existing order, or choose another table.
"Reservation date must be in the future"
The date and time of a new reservation have already passed. Choose a later time.
"This table is already reserved for the requested time slot"
The table you chose under Assign Table (Optional) has another reservation at that time. Choose a different table, or leave Assign later.
"No available tables for ... guests"
On Seat Guest, no table has enough seats for the party. Check the Capacity of your tables under Point of Sale > Tables.